
Have you ever been stuck on the side of the road, frustrated by a dead battery or malfunctioning headlight? For a 2011 Ford Transit Connect owner, the first step to addressing these issues is often understanding the fuse box diagram. This seemingly simple diagram can be the key to unlocking a world of electrical troubleshooting knowledge. It acts as a roadmap, guiding you through the intricate network of wires and circuits that power your vehicle.

Image: fusibles-voiture.com
This article will serve as your comprehensive guide to the 2011 Ford Transit Connect fuse box diagram, equipping you with the knowledge to identify faulty fuses and restore your vehicle’s electrical functionality with confidence. We’ll dive into the basics, explore the various fuse box locations, and equip you with the tools you need for successful troubleshooting.
Understanding the Fundamentals of Fuse Boxes
The fuse box, often referred to as the fuse panel, is the unsung hero of your vehicle’s electrical system. It’s a collection of fuses, small, replaceable devices that protect the electrical circuits from overloads and short circuits. When a fuse blows, it’s essentially sacrificing itself to prevent damage to more expensive components within your vehicle’s system.
Think of a fuse as a safety valve within a pressure cooker. If the pressure inside gets too high, the valve releases steam to prevent the cooker from exploding. A fuse works in a similar way. If too much current flows through a circuit, the fuse melts, breaking the circuit and stopping the flow of electricity. This prevents damage to the wires, electrical components, and even the vehicle itself.
Locating the Fuse Box in Your 2011 Ford Transit Connect
The 2011 Ford Transit Connect has two primary fuse box locations.
1. The Under-Hood Fuse Box: This fuse box is located on the driver’s side of the engine compartment, typically near the battery. It houses a wide range of fuses, including those associated with the engine, lights, and other major electrical components.
2. The Passenger Compartment Fuse Box: This fuse box is typically found under the dashboard, on the passenger side of the vehicle. It usually houses fuses for interior functions like power windows, sunroof, and audio systems.
Consulting the Fuse Box Diagram: Your Essential Guide
Now that you’ve located the fuse boxes, the next step is to understand the fuse box diagrams. These diagrams are essentially maps, showing the location of each fuse and its corresponding circuit. They are often printed in the user’s manual or attached to the inside of the fuse box cover. In the absence of a physical copy, you can easily find a printable version online by searching for “2011 Ford Transit Connect fuse box diagram” on a search engine.
These diagrams are incredibly useful when troubleshooting electrical issues as they provide the following information:
- **Fuse location:** The diagram will clearly show you the exact position of each fuse within the box.
- **Circuit identification:** Each fuse is labeled with the specific electrical circuit it protects. This allows you to quickly locate the fuse responsible for the component that’s malfunctioning.
- **Fuse amperage:** The diagram indicates the amperage rating of each fuse. This is vital when replacing a blown fuse, ensuring you use a fuse with the correct amperage for the specific circuit. Never use a fuse with a higher amperage rating than the original, as this can lead to electrical overloads and damage.
Troubleshooting Electrical Issues with Confidence: A Step-by-Step Guide
Now, let’s put your newfound knowledge to the test. Imagine you’re driving your 2011 Ford Transit Connect and suddenly, your headlights dim, and the radio stops working. This is a prime example of when a faulty fuse could be the culprit. Here’s a step-by-step approach to tackling the situation:
- Identify the Symptoms: Observe the specific electrical components that are malfunctioning. In this example, it’s the headlights and radio.
- Consult the Fuse Box Diagram: Determine which fuse or fuses control these components.
- Locate the Fuse(s): Carefully remove the cover of the appropriate fuse box. Using the diagram as your guide, locate the fuse that corresponds to the circuits in question.
- Inspect the Fuse(s): A blown fuse will typically have a broken or melted wire filament. You’ll notice a gap or a blackening of the fuse itself.
- Replace the Blown Fuse(s): If you find a blown fuse, replace it with a new fuse of the same amperage rating. It’s recommended to use only genuine Ford parts, available at dealership or authorized parts retailers.
- Test the Circuit(s): After replacing the fuse, check to see if the affected components now work properly. If they do, your issue is resolved. If not, the problem might be a more serious electrical issue requiring professional attention.
Beyond the Fuse Box: When Professional Help is Needed
While the fuse box diagram is an invaluable resource for addressing common electrical issues, it’s important to know its limitations. If troubleshooting using the diagram doesn’t solve the problem, or you encounter more complex electrical problems, don’t hesitate to seek professional help.
A qualified mechanic or electrician can diagnose and repair complex electrical issues, ensuring the safety and integrity of your vehicle’s electrical system.
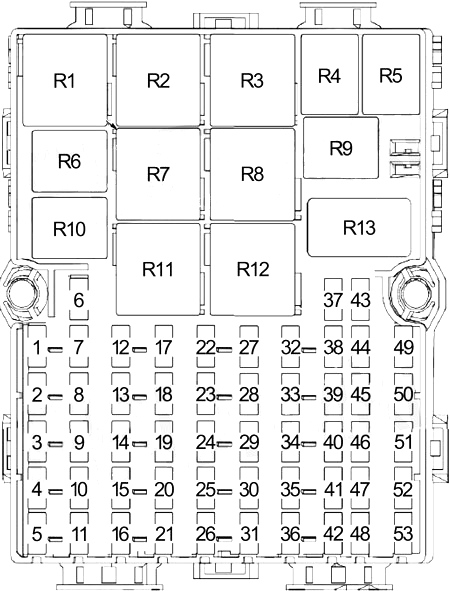
Image: www.autogenius.info
2011 Ford Transit Connect Fuse Box Diagram
Conclusion: Empowering Electrical Troubleshooting
Understanding the 2011 Ford Transit Connect fuse box diagram can be a game-changer for any vehicle owner. It empowers you to confidently tackle common electrical issues and save money on potentially costly repairs. By equipping yourself with the knowledge to identify, inspect, and replace fuses, you can maintain your vehicle’s electrical system in optimal condition. Remember, always prioritize safety and seek professional assistance when dealing with complex electrical problems.
This knowledge puts you in control of your vehicle’s electrical health, ensuring smooth journeys and peace of mind.


