
Have you ever experienced a sudden electrical malfunction in your Honda CR-V? A dead radio, flickering headlights, or a malfunctioning power window can be incredibly frustrating. Understanding your Honda CR-V’s fuse box diagram is the first step towards identifying and resolving these issues.

Image: enginebusch88.z19.web.core.windows.net
This comprehensive guide will take you through the intricacies of the 2011 Honda CR-V fuse box diagram, providing you with the knowledge to confidently troubleshoot electrical problems yourself. From locating the fuse box to deciphering the diagram, this guide has everything you need to become an electrical expert for your CR-V.
Understanding Fuse Boxes and Their Importance
Fuse boxes are essential components in every modern vehicle. They act as safety devices, protecting your car’s electrical system from damage caused by overloads or short circuits. Each fuse is designed to melt and break a circuit if the current exceeds a specified limit, preventing further damage to electrical components.
The fuse box in your Honda CR-V is a vital part of its electrical system, containing multiple fuses responsible for powering various essential features, including:
- Headlights
- Taillights
- Turn signals
- Radio
- Power windows
- Power door locks
- Air conditioning
- And many more!
When a fuse blows, it’s like a one-way ticket to troubleshooting mode for your car’s electrical system. However, don’t panic! Knowing how to use your fuse box diagram can save you time, money, and unnecessary frustration. Let’s delve into the world of the 2011 Honda CR-V fuse box diagram.
Locating the Fuse Boxes in Your 2011 Honda CR-V
The 2011 Honda CR-V has two main fuse boxes:
1. Under-the-Hood Fuse Box:
This is the first fuse box most owners encounter. It’s conveniently located under the hood, close to the battery, within easy reach for inspection. This fuse box is typically labeled, so you can easily identify it. The 2011 CR-V’s under-the-hood fuse box is usually found on the driver’s side, near the front of the engine compartment.
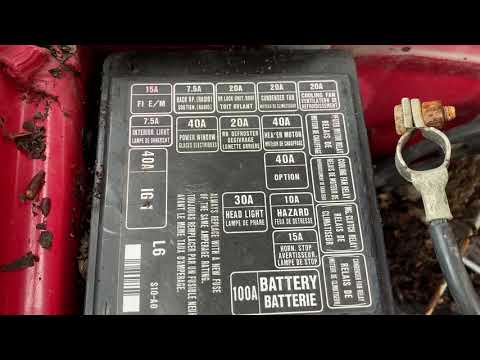
Image: schematiclistmorvant.z13.web.core.windows.net
2. Passenger Compartment Fuse Box:
This fuse box is tucked away in your car’s interior, often located on the driver’s side, behind the glove box. It operates as the central command center for your car’s electrical features inside the cabin. Be on the lookout for the specific location indicated in your vehicle’s owner’s manual.
Decoding the 2011 Honda CR-V Fuse Box Diagram
The fuse box diagram is your roadmap to navigating your Honda CR-V’s electrical system. It’s a visual representation of every fuse, its corresponding circuit, and its amperage rating. Understanding this diagram is crucial for diagnosing and repairing electrical problems.
Here is a breakdown of the key components of the fuse box diagram:
1. Fuse Numbers:
Each fuse is assigned a unique number for easy identification. These numbers serve as your reference point on the diagram when you’re trying to locate the correct fuse.
2. Circuit Descriptions:
The diagram provides concise descriptions of the circuits that each fuse protects. These descriptions are crucial for identifying the fuse related to the electrical problem you’re troubleshooting. Look for specific words like “headlights,” “radio,” “power windows,” etc.
3. Amperage Ratings:
The amperage (or amp) rating of each fuse is listed on the diagram. This tells you how much current the fuse can handle before it blows. This information is essential for choosing the correct replacement fuse.
4. Fuse Box Layout:
The diagram illustrates the location of each fuse within the box. This visual representation makes it easy to find the fuse you’re looking for, saving you from having to search through every compartment.
Troubleshooting Electrical Problems Using the Fuse Box Diagram
The first step to troubleshooting an electrical problem in your Honda CR-V is to check the fuse box diagram. Follow these steps:
1. Identify the Affected Circuit:
Determine what electrical component isn’t working. Is it the headlights, the radio, or something else?
2. Locate the Corresponding Fuse:
Refer to your fuse box diagram to find the fuse that protects the specific circuit you’ve identified. Locate the fuse number and its circuit description.
3. Inspect the Fuse:
Carefully remove the suspected fuse and visually inspect it. Look for a broken wire or a melted fuse element. This indicates a blown fuse.
4. Replace the Blown Fuse:
If you’ve found a blown fuse, replace it with a fuse of the same amperage rating. Never use a fuse with a higher amperage, as this could cause further damage to your electrical system. Using a lower amp replacement might cause the new fuse to blow prematurely.
5. Retest the Circuit:
After replacing the fuse, test the circuit to see if the problem is resolved. If the problem persists, you may need to investigate other potential causes, such as a faulty wiring connection or a malfunctioning electrical component.
Important Tips for Using Your Fuse Box Diagram
Here are some additional tips to help you maximize the usefulness of your fuse box diagram:
1. Keep It Accessible:
Store your fuse box diagram in a convenient location, such as the glove box or your car’s owner’s manual. This way, you’ll have access to it whenever you need it.
2. Familiarize Yourself with the Diagram:
Take some time to study your fuse box diagram. Understanding the key components and the layout of the diagram will make troubleshooting easier. You’ll be able to quickly locate the fuse you need.
3. Use a Flashlight:
If you’re working in dim light, use a flashlight to illuminate the fuse box and the fuses themselves. This will help you see clearly and avoid making mistakes when inspecting and replacing fuses.
4. Never Use a Metal Object:
When removing or inserting fuses, never use a metal object. Using a metallic object can create a short circuit and damage your car’s electrical system. Use a dedicated fuse puller or pliers with insulated grips.
Honda Crv 2011 Fuse Box Diagram
Conclusion
Navigating the electrical system of your Honda CR-V doesn’t have to be a daunting task. Understanding and utilizing your fuse box diagram can empower you to diagnose and fix electrical problems effectively. By following the steps outlined in this guide, you can become more comfortable with your vehicle’s electrical system, enabling you to resolve common issues and save money on potential repair costs. Remember to always consult your owner’s manual and, if you are unsure about anything, don’t hesitate to seek professional assistance from a qualified mechanic.


