
Ever had a vital feature on your Dodge Ram 2500 suddenly stop working? Maybe your headlights flickered out on a dark road, or the power windows refused to budge. These situations can be frustrating, but they don’t have to be mysterious. Understanding your truck’s fuse box diagram is the key to diagnosing and fixing these electrical gremlins. Let’s delve into the world of fuses, relays, and the intricate electrical system that powers your mighty Ram 2500.

Image: mechanicharris55.z13.web.core.windows.net
The fuse box diagram is like a roadmap to your truck’s electrical system. It’s a visual representation of where each fuse is located, what it protects, and how to access it for replacement. Armed with this diagram, you can become a more confident and capable owner, capable of addressing electrical issues quickly and effectively.
Decoding the Fuse Box
Every Dodge Ram 2500 boasts two fuse boxes, strategically placed for maximum accessibility:
- The Under-Hood Fuse Box: This box is tucked under the hood, usually near the battery. It houses fuses protecting essential components like the engine, lights, and charging systems.
- The Passenger Compartment Fuse Box: Located inside the cabin, typically under the dashboard, this box holds fuses responsible for interior lighting, power outlets, window controls, and other comfort features.
Navigating the Diagram
The fuse box diagram is your key to interpreting the electrical labyrinth within your Ram 2500. These diagrams, often found within the owner’s manual or online resources like the Dodge Ram 2500 forums, are typically laid out in a clear, color-coded format with each fuse clearly labeled:
- Fuse Number: A unique identifier for each fuse within the box.
- Circuit Name: This label describes the component or function protected by the fuse. Examples include “Headlights,” “Power Windows,” or “Radio.”
- Amperage Rating: This number reveals the maximum current the fuse can safely handle.
Identifying and Replacing Fuses
A blown fuse, evident by a broken filament inside the fuse, is the culprit behind many electrical malfunctions. Take these steps to diagnose and replace a blown fuse:
- Locating the Fuse Box: Refer to your fuse box diagram to pinpoint the location of the problematic fuse based on its circuit name.
- Visual Inspection: Carefully inspect each fuse in the designated box for any signs of damage or breakage.
- Fuse Removal: Use a fuse puller or a pair of needle-nose pliers to gently remove the suspected fuse.
- Verify the Problem: Look for a broken filament inside the fuse. If it’s blown, you’ve found your culprit.
- Fuse Replacement: Replace the blown fuse with a new fuse of the same amperage rating. Never use a fuse with a higher amperage as it can lead to overheating and potential damage.
- Testing the Circuit: Turn on the component the fuse protected to verify it’s working again.
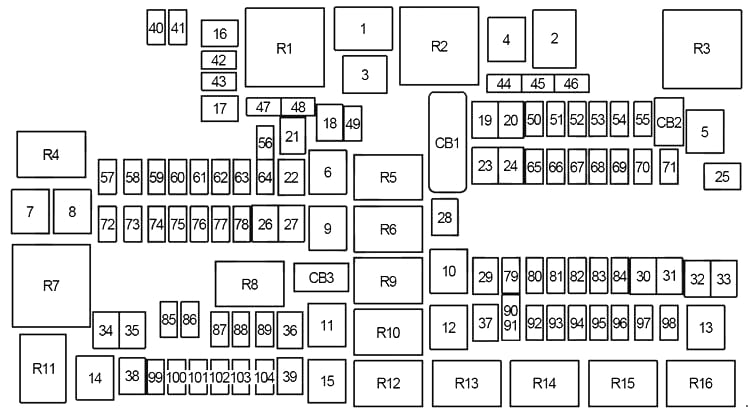
Image: schematicpartmoll.z13.web.core.windows.net
Understanding Relays
Besides fuses, relays play a vital role in the electrical system. Relays are electromagnetic switches that control large electrical loads. They prevent drawing heavy currents directly through the fuse box, thereby protecting these delicate components.
- Understanding the Function: Relays act as intermediaries, allowing a small electrical current to control a much larger one. This is particularly useful for components like headlights, fans, and pumps, which draw significant power.
- Relay Location: Relays are often located within a dedicated box near the fuse box, offering a centralized access point for troubleshooting.
- Diagnosing Relay Issues: Relays can fail just like fuses. If a circuit isn’t working, check the corresponding relay for any signs of damage or malfunction.
- Relay Replacement: Replace faulty relays with the correct type for your truck’s specific model and year.
Harnessing the Power of the Fuse Box Diagram
The fuse box diagram is your key to confidently troubleshooting electrical problems in your Dodge Ram 2500. By understanding its layout and mastering the basics of fuses and relays, you’ll be equipped to diagnose and fix electrical glitches, ensuring the smooth operation of your truck.
Remember, safety should always come first. If you’re unsure about working with electrical systems, it’s always best to consult a qualified mechanic.
Dodge Ram 2500 Fuse Box Diagram
Conclusion
The fuse box diagram isn’t simply a technical document; it’s your gateway to understanding the electrical intricacies of your Dodge Ram 2500. With this diagram as your guide, you’ll be able to troubleshoot minor electrical hiccups on your own, saving time and potentially even money. So, familiarize yourself with this map to your truck’s electrical system and become a more informed and empowered owner!
Are you ready to conquer any electrical challenges your Ram might throw your way? Share your experiences or any questions you have in the comments below. Let’s unlock the power of your truck’s electrical system together!


